

| หากต้องการใบเสนอราคา / ใบแจ้งหนี้ ติดต่อได้ทาง LINE Official: @mikroelec |
 |
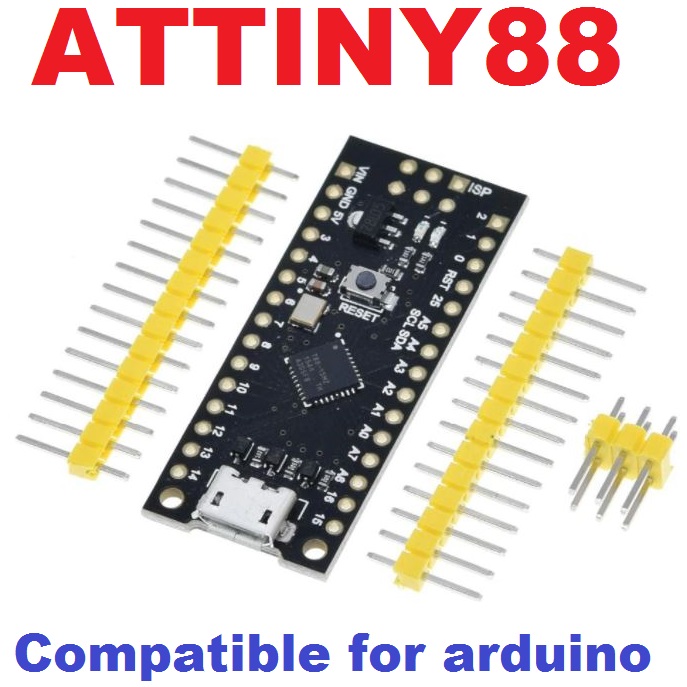
ATTINY88 Micro Development Board 16Mhz /Digispark ATTINY85 Upgrade/NANO V3.0 ATmega328 Extended Compatible for arduino


| รหัสสินค้า | SKU-01897 |
| หมวดหมู่ | Board Arduino |
| ราคา | 90.00 บาท |
| สถานะสินค้า | พร้อมส่ง |
| ลงสินค้า | 25 มี.ค. 2565 |
| อัพเดทล่าสุด | 25 ก.ย. 2565 |
| จำนวน | ชิ้น |
หยิบลงตะกร้า

รายละเอียดสินค้า
The MH-ET LIVE Tiny88(16.0MHz) microcontroller board is similar to the Arduino line, just cheaper, smaller, and a bit less powerful. With the ability to use the familiar Arduino IDE, the MH-ET LIVE Tiny88(16.0MHz) is a JUMP Into Electronics board, or suitable for when other boards are too big or too big.The MH-ET LIVE Tiny88(16.0MHz) is supplied. send assembled except for headersincluded and easy to solder by yourself.
Product details:
Support Arduino IDE 1.0 + (OSX/WIN/Linux)
1. Power via USB or external source-5V or 7-35V (recommended 12V or less,
auto select)
2. Board 500mA 5V Regulator
3.USB
4. 26 I/O Pins (2 for USB only if your program communicates over USB, otherwise you can use 6 even if you are programming via USB)
5. 8K FLASH MEMORY (about 6K after bootloader)
6. I2C and SPI
7. 26-PWM (26 software PWM pins, only 2 (D9,D10) hardware PWM)
8. ADC 8 Pins
9.LED light and test/status
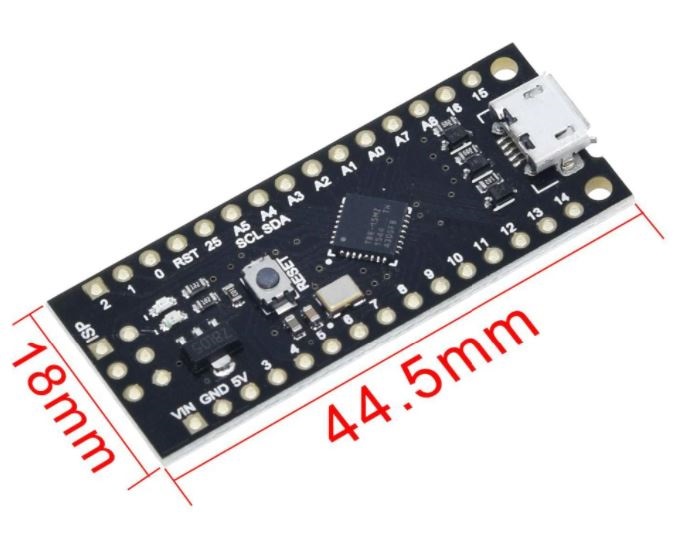
10. Size (mm): 44.5x18.3x3
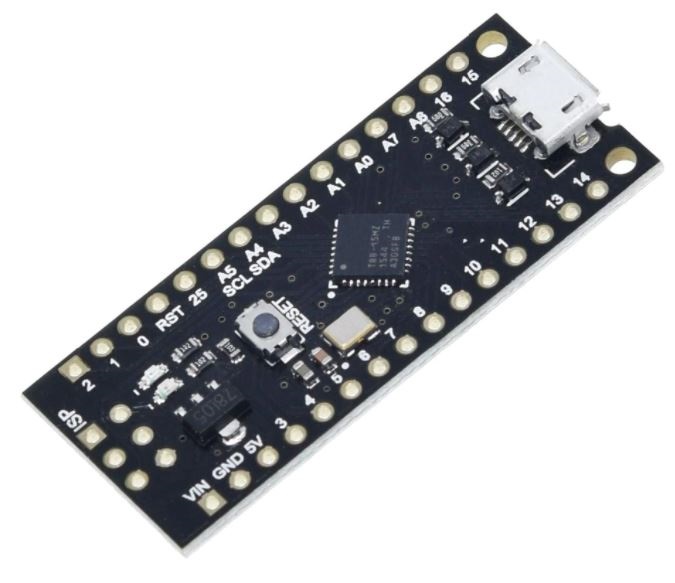
Pinout:

Installation instructions:
First download the appropriate Arduino package at the Arduino.CC website : https://www.arduino.cc/en/Main/Software.
If using Arduino 1.6.6 or higher and Windows - You will need to download and Install Driver Manually Download Unzip and Run “Install Driver” (on 32bit Systems) or “DPInst64” (on 64bit Systems) Driver File here: https://github.com/MHEtLive/MHEtLiveArduino/releases/download. /1.0.0/
2.0a4.rar
Install or Unzip the Arduino Application.
Run Arduino application.
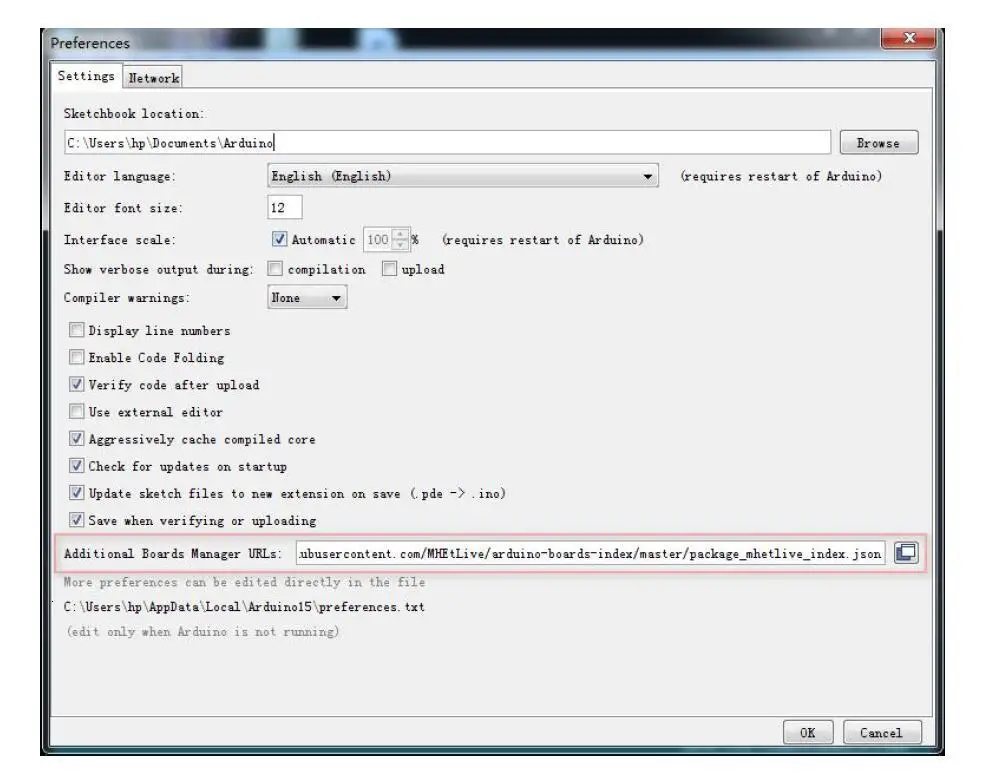
In the Arduino application, go to the “File” menu and select “Settings”, in the “Additional Board Manager URL” box labeled:
Https://raw.githubusercontent.com/MHEtLive/arduino-boards-index/master/p
Ackage_mhetlive_index.json and click OK;
Go to “ Tools ”Menu then “ Boards ”Submenu-select “Board Manager” and then from drop down category select “ Contributed ”:
Select “ MH-ET LIVE BOARDS ” package and click “ Install ” button.
You will see download progress bar below “ Board Manager ” window, when complete it will show “ Install ”Next TO that number on the list.
WINDOWS Users: When complete install pop up Driver Install Wizard window, please click " Next " on Window to install drivers for MH-ET LIVE.
boards (if you have them installed, this installer will update them and install missing)
With complete installation close “ Board Manager ”window and select MH-ET LIVE Board “ MH-ET LIVE Tiny88(16.0MHz) ” from Tools → board menu
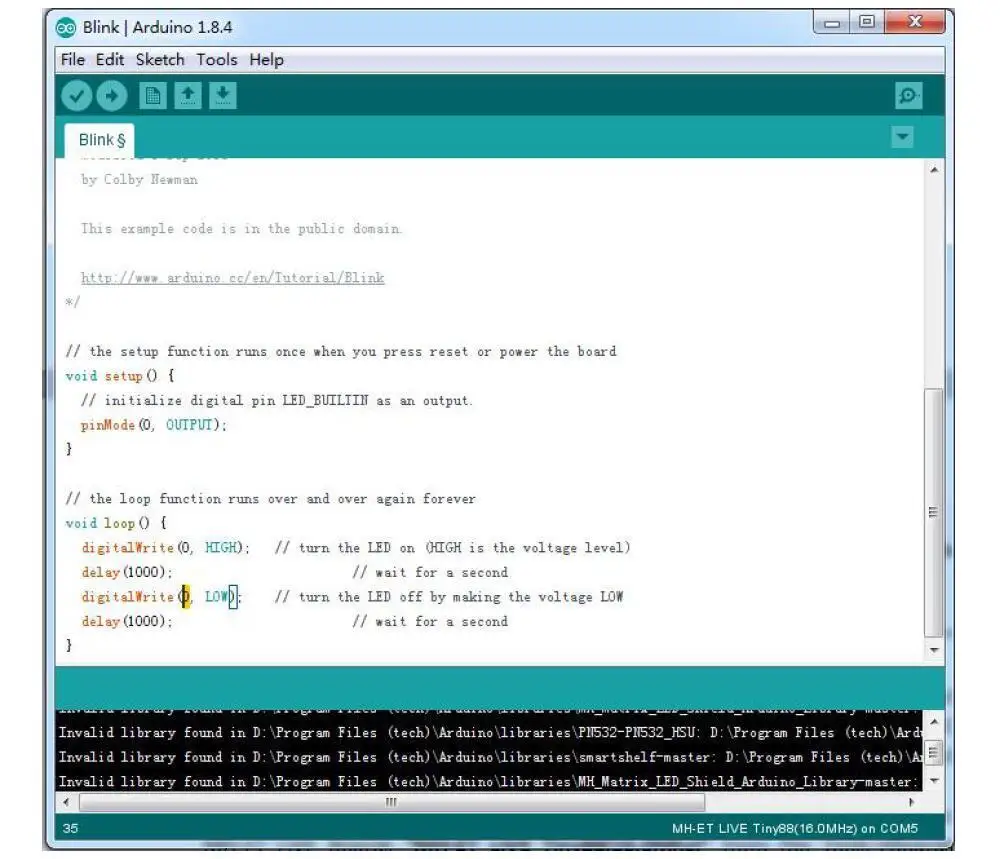
Select an example that comes with the Arduino IDE: Select a Development Board for example MH-ET LIVE Tiny88 in the toolbar Open Program Files>> Examples>> Basic>>Blink Change port 13 in Program0. Port, Compile and Into The MH-ET LIVE Tiny88(16.0MHz) Based on above method can be seen on-board LED blink accordingly.
The frequency specified by the program ( Note: when downloading the program, do not connect the module, first wait for a prompt, insert the module after compiled, then plug it in and wait for the automatic download complete ).
วิธีการชำระเงิน
ชำระเงินผ่านธนาคาร
ชำระเงินด้วยการ Scan QR


ไมโครอิเล็กทรอนิกส์
098-xxxxxx-9
Accept All Banks | รับเงินได้จากทุกธนาคาร
นโยบายการเปลี่ยนหรือคืนสินค้า
หากสินค้าชำรุดหรือใช้งานไม่ได้ สามารถขอเปลี่ยนสินค้าได้ภายใน 7 วัน
หมายเหตุ
ต้องไม่เสียหายอันเกิดจากใช้งานผิดพลาด ใช้ผิดวิธี ต่อไฟผิดขั้ว จ่ายไฟเกินกำหนด หรืออื่นๆที่ตรวจสอบแล้วไม่ได้เกิดจากความผิดพลาดจากการผลิตสินค้า
หมายเหตุ
ต้องไม่เสียหายอันเกิดจากใช้งานผิดพลาด ใช้ผิดวิธี ต่อไฟผิดขั้ว จ่ายไฟเกินกำหนด หรืออื่นๆที่ตรวจสอบแล้วไม่ได้เกิดจากความผิดพลาดจากการผลิตสินค้า

Member
▲
▼
รายการสั่งซื้อของฉัน
รายการสั่งซื้อของฉัน
ข้อมูลร้านค้านี้

MikroElectronic
จำหน่ายอุปกรณ์อิเล็กทรอนิกส์ โมดูล เครื่องมือ และอุปกรณ์ต่างๆ arduino อาดูโน อะไหล่เครื่องใช้ไฟฟ้า อะไหล่อิเล็กทรอนิกส์ รับออกแบบวงจร เขียนโปรแกรมด้วยอาดูโน รับทำโครงงาน นักเรียนนักศึกษา ให้คำปรึกษาแก้ปัญหาโครงงาน ออกแบบและสร้างงานต้นแบบ ร้านตั้งอยู่ ซอยร่วมสุข ปทุมธานี สถานที่ใกล้เคียง ดอนเมือง สรงประภา ศรีสมาน นนทบุรี แจ้งวัฒนะ
เบอร์โทร : 0984829329
อีเมล : mikroelec@gmail.com
อีเมล : mikroelec@gmail.com
ส่งข้อความติดต่อร้าน
เกี่ยวกับร้านค้านี้
ค้นหาสินค้าในร้านนี้
ค้นหาสินค้า
สินค้าที่ดูล่าสุด
บันทึกเป็นร้านโปรด
Join เป็นสมาชิกร้าน
แชร์หน้านี้
แชร์หน้านี้
↑
TOP เลื่อนขึ้นบนสุด
TOP เลื่อนขึ้นบนสุด
สินค้าในตะกร้า ({{total_num}} รายการ)

ขออภัย ขณะนี้ยังไม่มีสินค้าในตะกร้า
ราคาสินค้าทั้งหมด
฿ {{price_format(total_price)}}
- ฿ {{price_format(discount.price)}}
ราคาสินค้าทั้งหมด
{{total_quantity}} ชิ้น
฿ {{price_format(after_product_price)}}
ราคาไม่รวมค่าจัดส่ง
รวมภาษีมูลค่าเพิ่มแล้ว
➜ เลือกซื้อสินค้าเพิ่ม