

| หากต้องการใบเสนอราคา / ใบแจ้งหนี้ ติดต่อได้ทาง LINE Official: @mikroelec |
 |
GY-521 MPU-6050 บัดกรีขาแล้ว MPU6050 Module 3 Axis analog gyro sensors+ 3 Axis Accelerometer Module


| รหัสสินค้า | SKU-01286 |
| หมวดหมู่ | เซนเซอร์ความเร่ง / ไจโร / IMU |
| ราคา | 70.00 บาท |
| สถานะสินค้า | พร้อมส่ง |
| ลงสินค้า | 12 เม.ย. 2564 |
| อัพเดทล่าสุด | 25 พ.ค. 2568 |
| จำนวน | ชิ้น |

รายละเอียดสินค้า
Product description:
Use the chip: MPU-6050
Power supply :3-5v (internal low dropout regulator)
Communication modes: standard IIC communications protocol
Chip built-in 16bit AD converter, 16-bit data output
Gyroscope range: ± 250 500 1000 2000 ° / s
Acceleration range: ± 2 ± 4 ± 8 ± 16g
Immersion Gold PCB machine welding process to ensure quality
Pin pitch 2.54mm
MPU6050 Module Pinout
The MPU6050 module’s pinout is as follows:
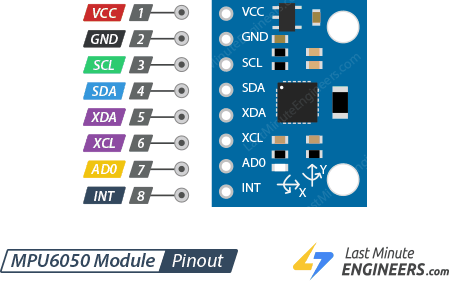
VCC supplies power to the module.
GND is the ground pin.
SCL is a serial clock pin for the I2C interface.
SDA is a serial data pin for the I2C interface.
XDA is the external I2C data line. The external I2C bus is for connecting external sensors, such as a magnetometer.
XCL is the external I2C clock line.
AD0 allows you to change the I2C address of the MPU6050 module. It can be used to avoid conflicts between the module and other I2C devices or to connect two MPU6050s to the same I2C bus. When you leave the ADO pin unconnected, the default I2C address is 0x68HEX; when you connect it to 3.3V, the I2C address changes to 0x69HEX.
INT is the Interrupt Output pin. The MPU6050 can be programmed to generate an interrupt upon detection of gestures, panning, zooming, scrolling, tap detection, and shake detection.
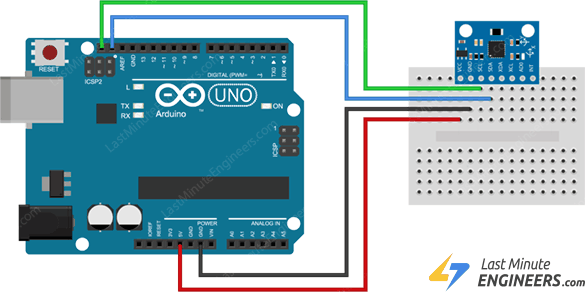
Wiring an MPU6050 Module to an Arduino
Let’s hook the MPU6050 module to the Arduino.
Connections are straightforward. Begin by connecting the VCC pin to the Arduino’s 5V output and the GND pin to ground.
Now we are left with the pins that are used for I2C communication. Note that each Arduino board has different I2C pins that must be connected correctly. On Arduino boards with the R3 layout, the SDA (data line) and SCL (clock line) are on the pin headers close to the AREF pin. They are also referred to as A5 (SCL) and A4 (SDA).
Check out the table below for quick reference.
The diagram below shows how to connect everything.
วิธีการชำระเงิน
ชำระเงินผ่านธนาคาร
ชำระเงินด้วยการ Scan QR


นโยบายการเปลี่ยนหรือคืนสินค้า
หมายเหตุ
ต้องไม่เสียหายอันเกิดจากใช้งานผิดพลาด ใช้ผิดวิธี ต่อไฟผิดขั้ว จ่ายไฟเกินกำหนด หรืออื่นๆที่ตรวจสอบแล้วไม่ได้เกิดจากความผิดพลาดจากการผลิตสินค้า

Member

อีเมล : mikroelec@gmail.com
TOP เลื่อนขึ้นบนสุด
